EMBER Quick Start Guide
Welcome! This page helps you power up your HARDWARIO EMBER and choose what to do next:
- Run a managed LoRaWAN backend via EMBER Cloud Service (ChirpStack + Node-RED)
- Connect EMBER to your own ChirpStack
- Connect EMBER to The Things Stack (TTS)
Official documentation:
Before you start
What EMBER is
EMBER is an industrial LoRaWAN gateway (IoT Hotspot) based on MikroTik RBM33G, designed for outdoor deployments (IP67 enclosure).
Hardware description: https://docs.hardwario.com/ember/hardware-description/
You will need
- EMBER gateway (Hotspot)
- LoRaWAN antenna (required)
- Power source:
- 24 V DC adapter / 24 V DC power supply, or
- 24 V DC passive PoE via the WAN port
- Internet connectivity (WAN and/or LTE, depending on your setup)
- A LoRaWAN backend (EMBER Cloud Service / ChirpStack / TTS / other)
Quick links
- EMBER product page (datasheet + overview): https://www.hardwario.com/ember
- Hotspot configuration (LAN IP, login, RouterOS script): https://docs.hardwario.com/ember/hotspot-configuration/
- EMBER Cloud Service (managed ChirpStack + Node-RED): https://docs.hardwario.com/ember/cloud-service/
1) Set up your EMBER
1.1 Attach antennas (important)
- Attach the LoRaWAN antenna before powering on.
- If your unit includes LTE, it may use two LTE antennas (internal/external depending on configuration).
More details: https://docs.hardwario.com/ember/hardware-description/#antennas
1.2 Power the gateway
EMBER can be powered by:
- 24 V DC power adapter
- 24 V DC power supply
- 24 V DC passive PoE through the WAN Ethernet port
More details: https://docs.hardwario.com/ember/hardware-description/#power-supply-options
1.3 Outdoor mounting safety note
For outdoor installations, EMBER Hotspot has to be mounted with connectors facing down.
2) Connect for local access
EMBER runs MikroTik RouterOS.
For initial access and management, use the WAN interface (leftmost RJ-45 port) and standard RouterOS tools.
If you don't already have Winbox 4 installed, follow the Winbox 4 Installation guide.
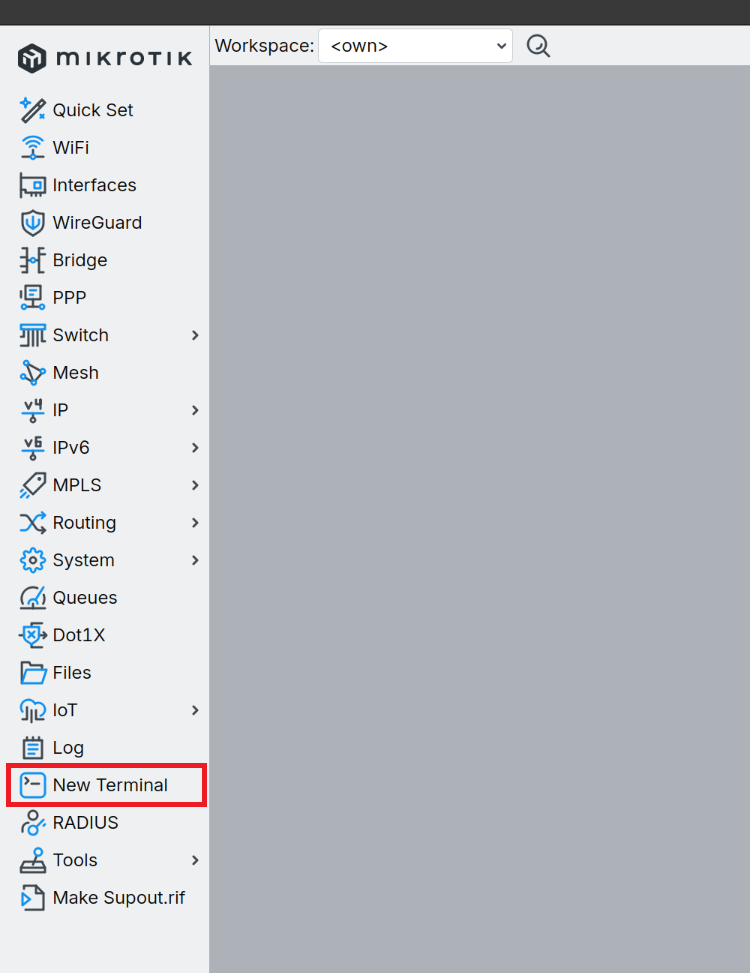
2.1 Connect to Ember using Winbox 4
After opening the application, look at the list where you should see your EMBER.
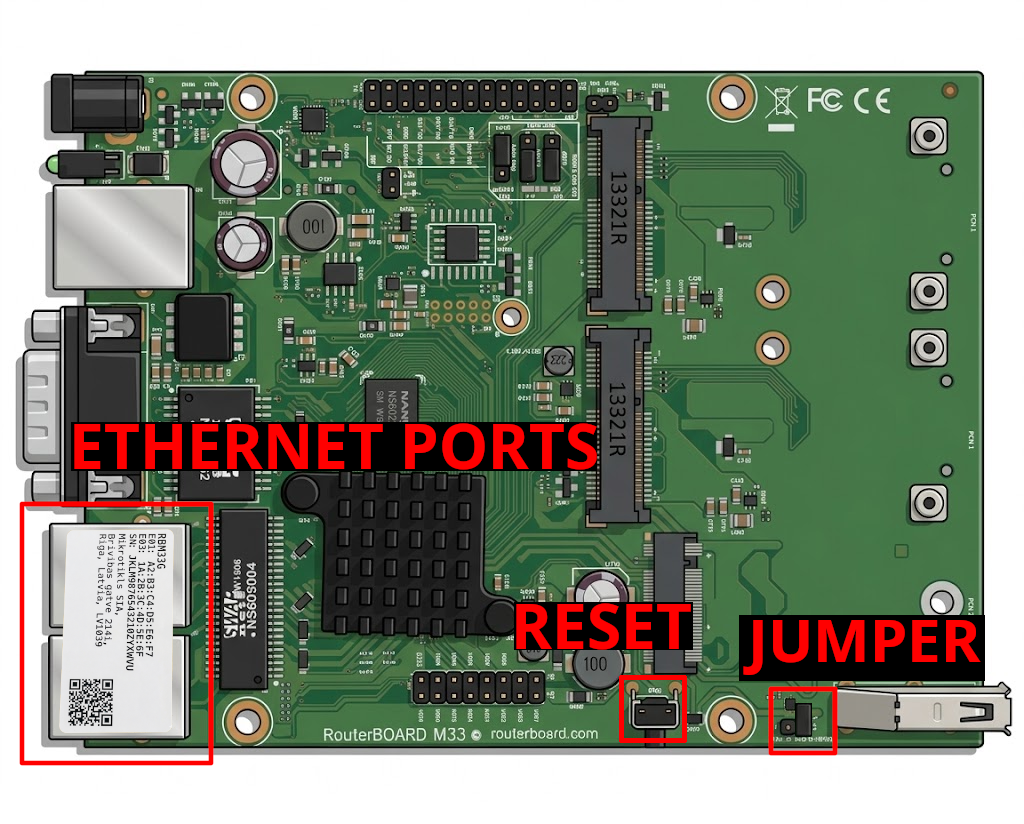
- If there is more than one device, look at the EMBER board — on its left side there are two ethernet connectors with a sticker on them. On the sticker, find the MAC address — a combination of numbers and letters after the text E01 (for example: E01: 48:A5:8A:4F:17:A6).
- Go back to Winbox and find the device with the matching MAC address. Click on the device in the list to select it.
- Make sure the jumper on the board is removed. The location of the jumper is shown in the picture below.
Main documentation (recommended start):
- EMBER Hotspot configuration & local access:
https://docs.hardwario.com/ember/hotspot-configuration/
3) Initial RouterOS Configuration Script
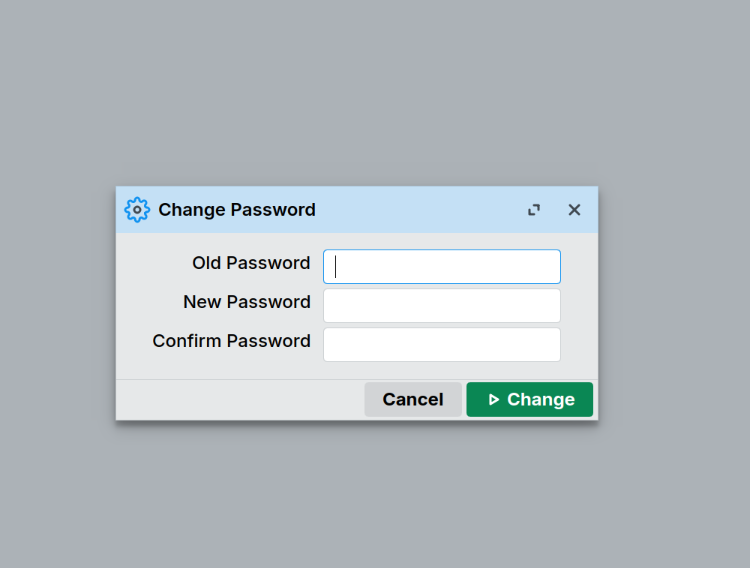
3.1 Set Password
Open a New Terminal window (or connect via SSH to your EMBER at 172.31.255.254):
Set a secure admin password Then paste the following script, or you can do it manually.
/user set admin password=YOUR_NEW_PASSWORD
In the left panel, open System→ Password.

Fill the box:
- Old Password: ember (default password)
- New Password:
<YOUR_PASSWORD> - Confirm Password:
<YOUR_PASSWORD> - Click Change
3.2 Run Base Configuration
Then paste the following script, or you can do it manually.
/system identity set name=ember
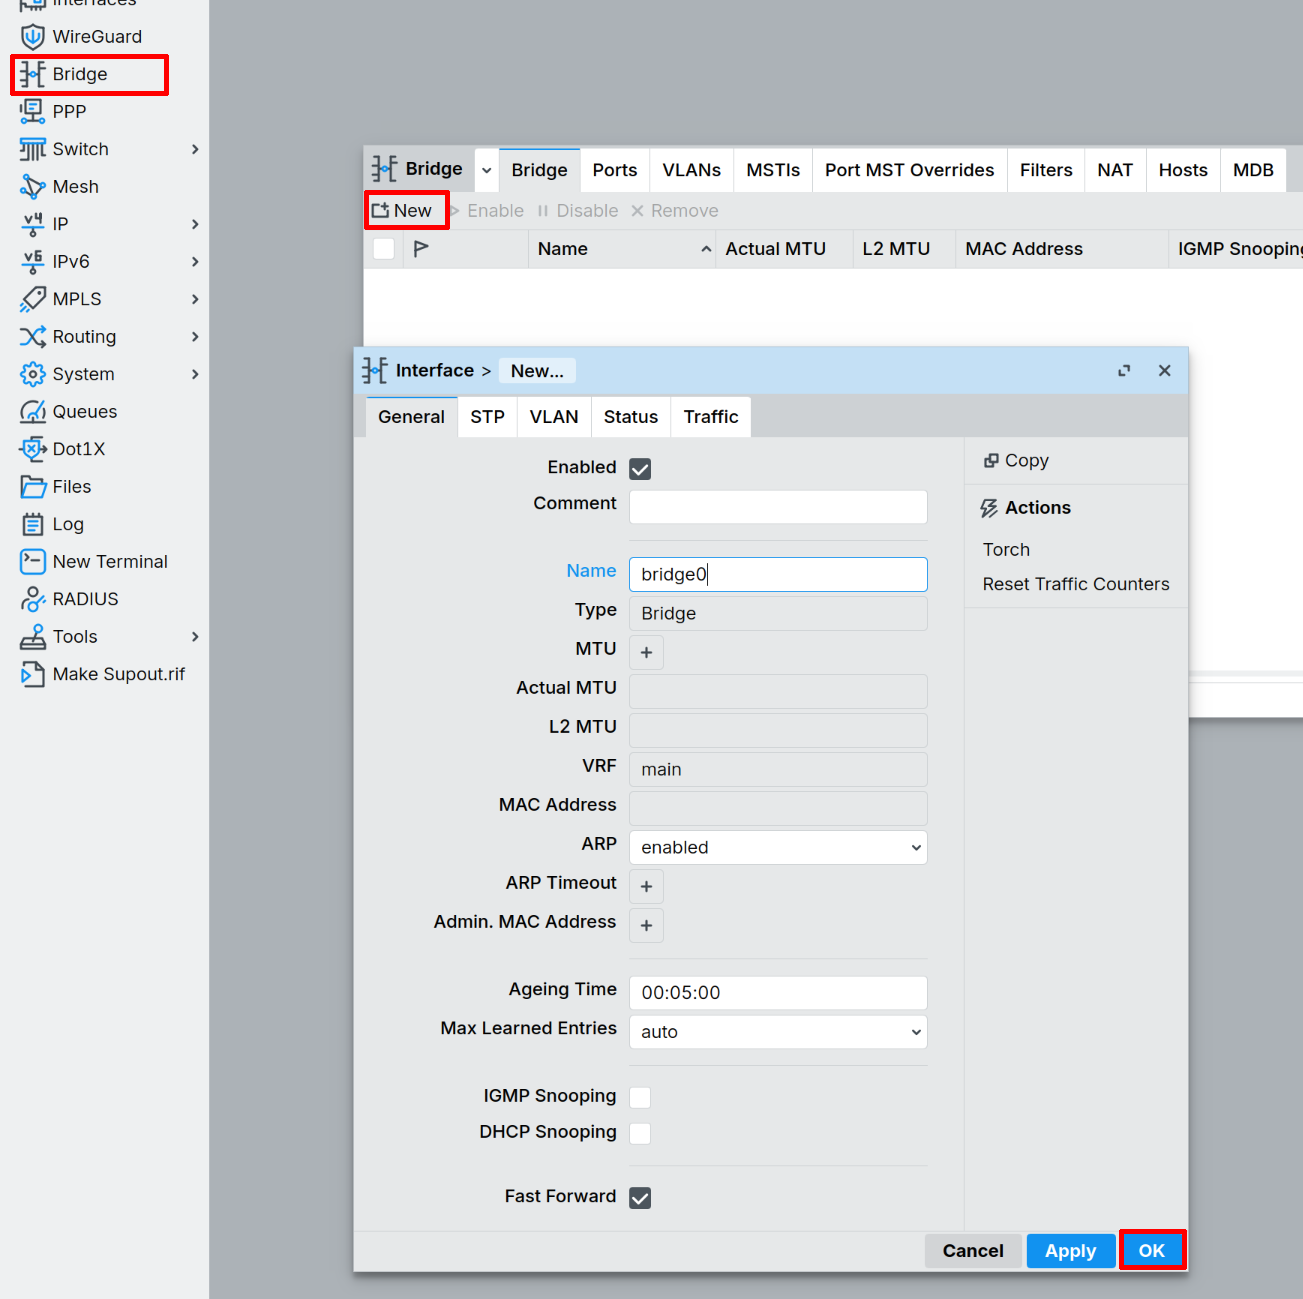
/interface bridge add name=bridge0
/interface bridge port add bridge=bridge0 interface=ether2
/interface bridge port add bridge=bridge0 interface=ether3
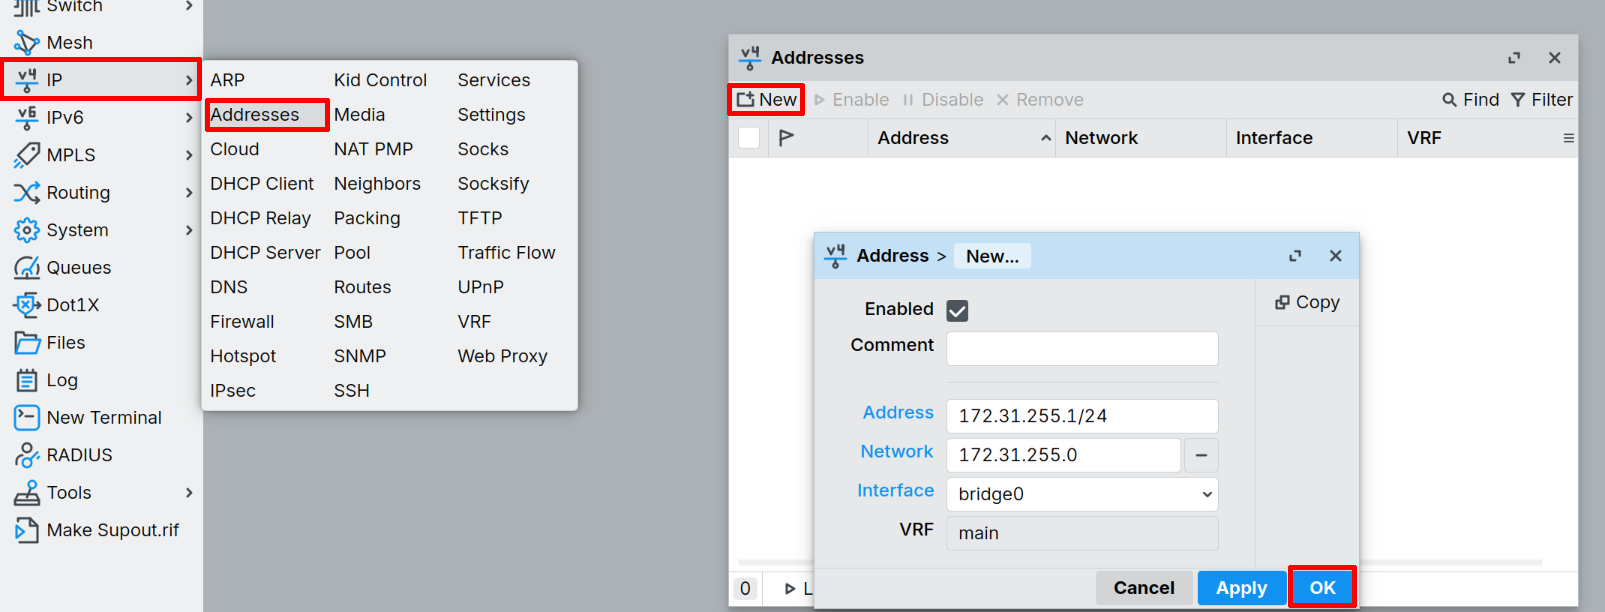
/ip address add address=172.31.255.1/24 interface=bridge0 network=172.31.255.0
/ip dhcp-client add interface=ether1 disabled=no
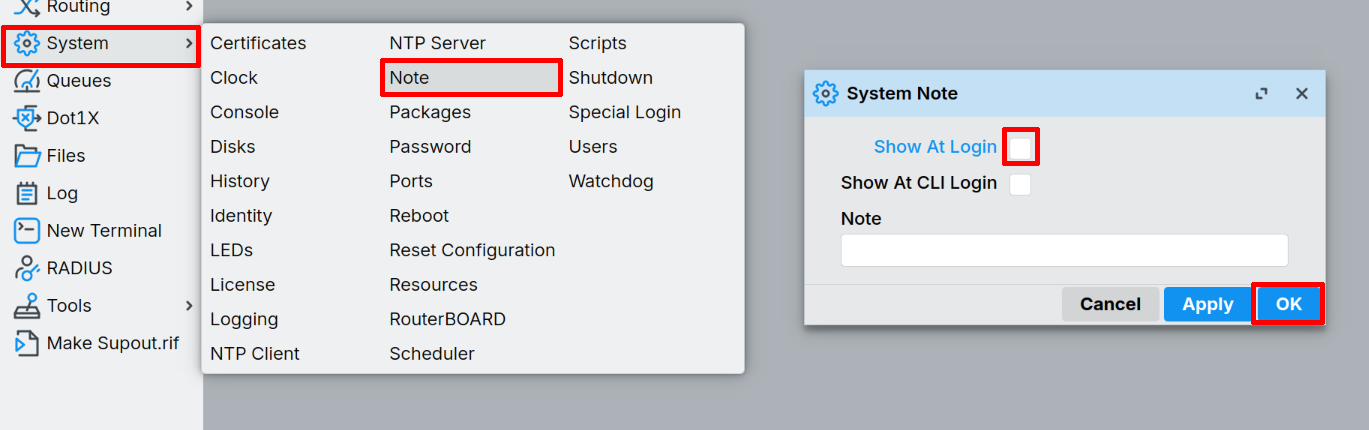
/system note set show-at-login=no
Press Enter to execute the script. Now you need to update RouterOS. Go to Checks for RouterOS updates and installs if available..
Manual Setup:
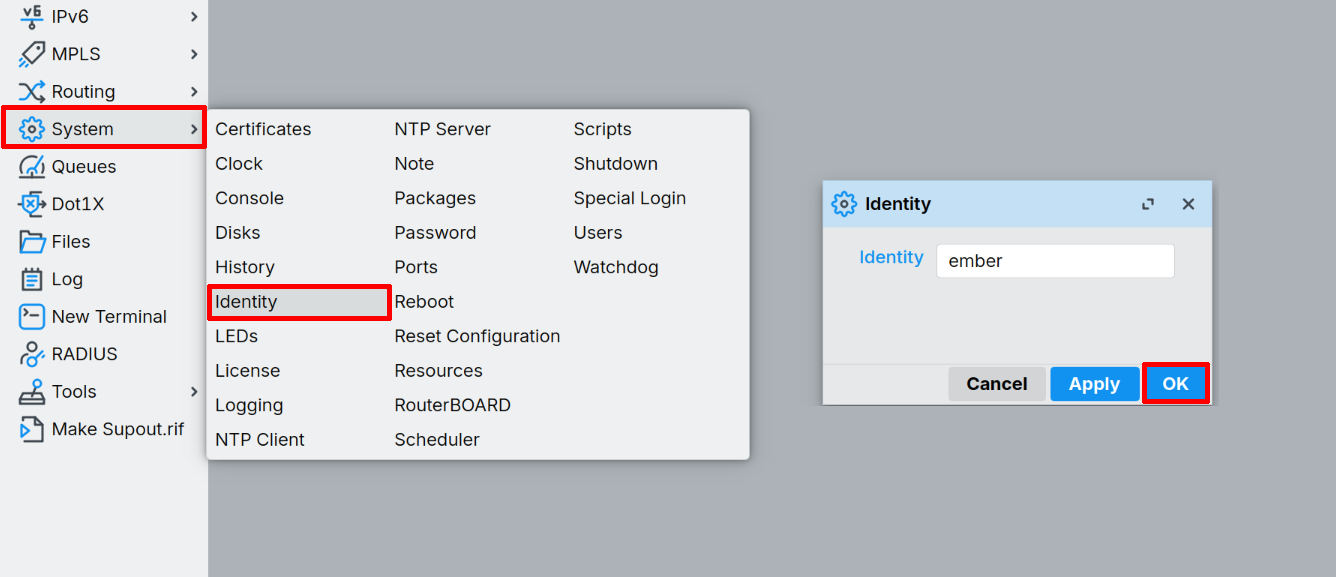
Sets the system identity to "ember".
- System → Identity change your identity to ember and click OK.
Creates a bridge interface (bridge0) and adds ether2 and ether3 to it.
- Bridge → New change name to bridge0 and click OK.
Assigns IP address 172.31.255.1/24 to the bridge for LAN access and add ports to the bridge.
- IP → Addresses → New and fill Address, Network and select Interface:
- Addresses: 172.31.255.1/24
- Network: 172.31.255.0
- Interface: bridge0
- Confirm it by clicking OK
-
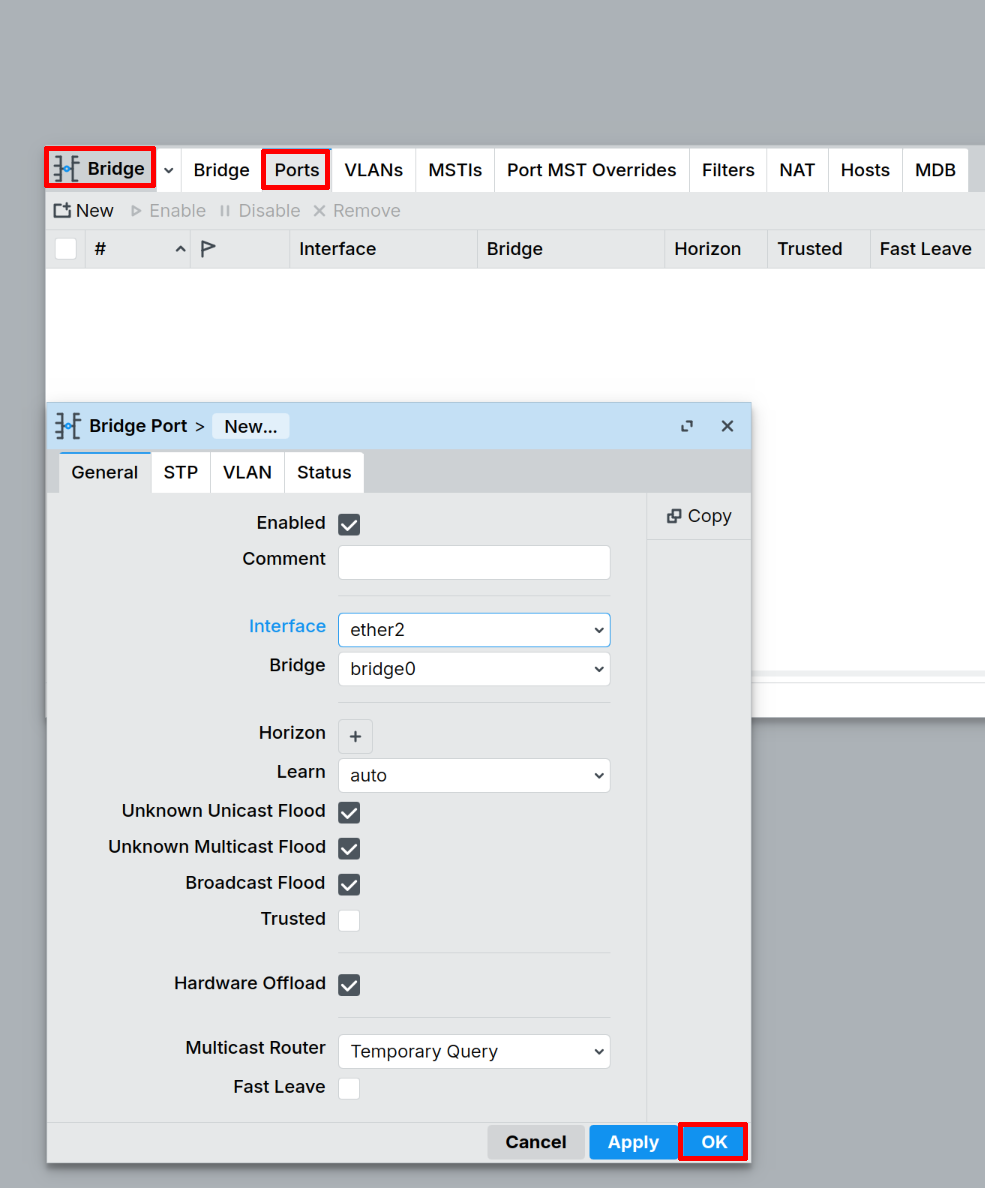
In Bridge window go to Ports → New, select interface ether2. Make sure, that the bridge0 is selected and click OK
-
In Bridge window go to Ports → New, select interface ether3. Make sure, that the bridge0 is selected and click OK

Enables DHCP client on ether1 (WAN) for internet connectivity.
- In the left panel IP → DHCP Client → New, select ether1 as interface and click OK.

Turn on welcome note.
- In the left panel System → Note, uncheck Show At Login and click OK.
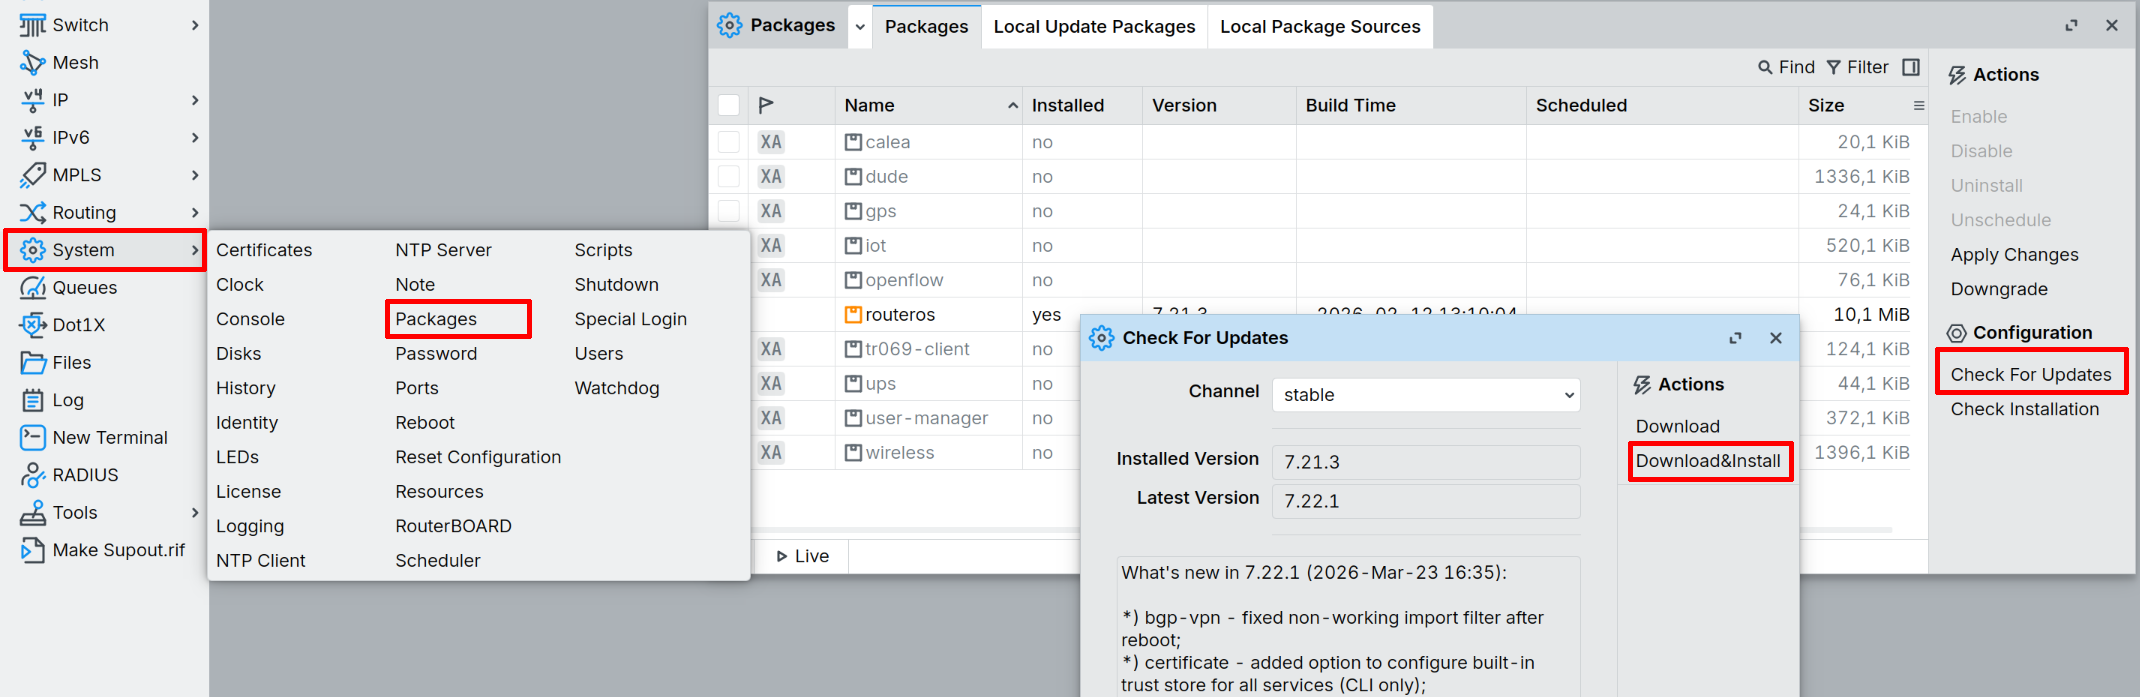
Checks for RouterOS updates and installs if available.
- In the left panel System → Packages → Check for Updates. A new window will open, check if the versions match. If not, click Download&Install and wait a few minutes.

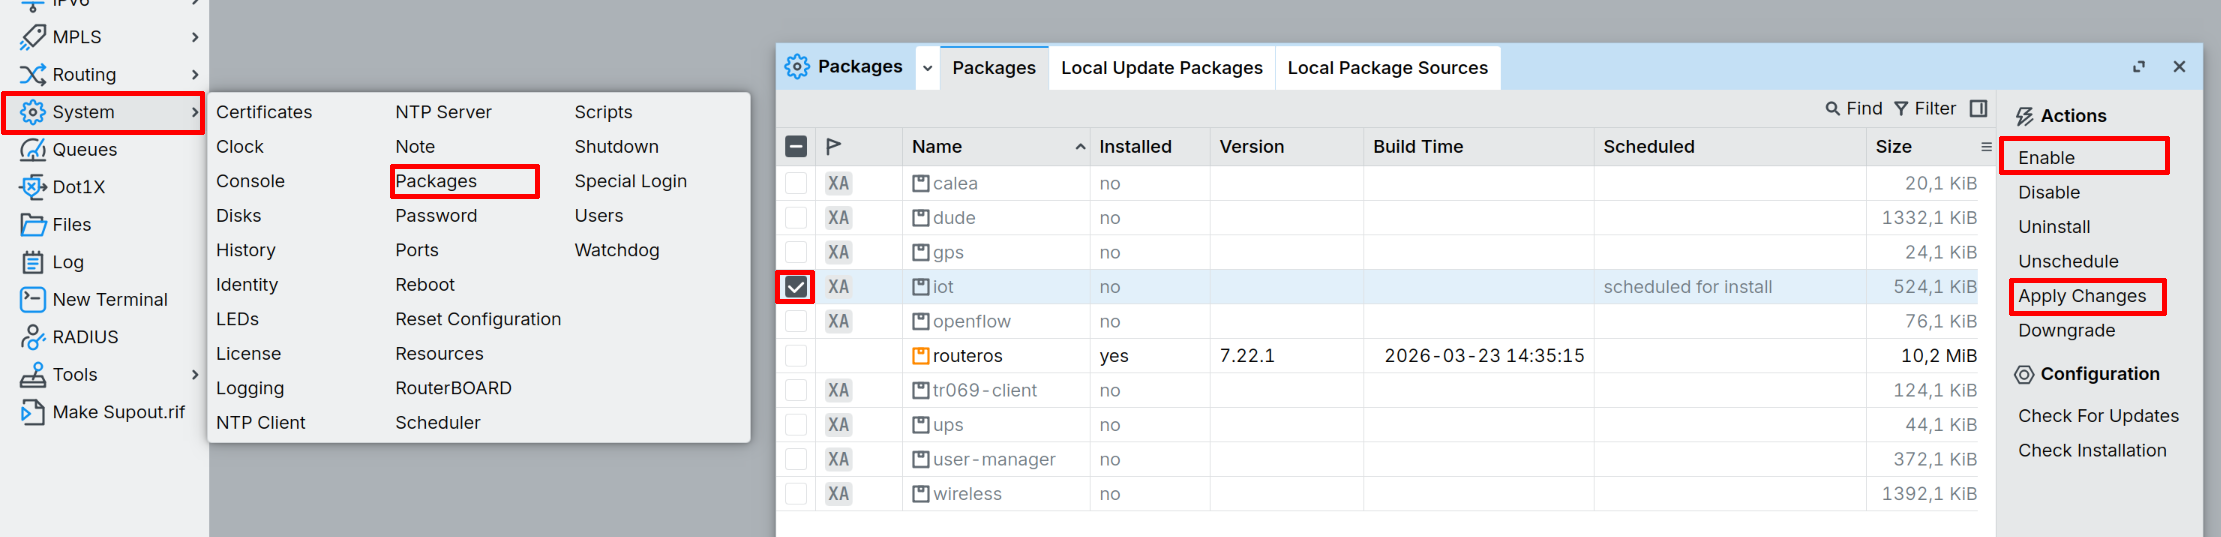
3.3 Install IoT Package
After reconnecting, go to the left panel System → Packages → Check for Updates. At the list, find iot, click on it. In the right panel, click Enable and then Apply Changes. A new window will open, click OK and wait a few seconds.
3.4 Configure LoRa Interface and Update Bootloader
After reconnecting following the reboot, paste this script in the terminal to configure the LoRa interface:
/iot lora servers remove [find]
What this script does:
- Sets the LoRa antenna to use the uFL connector
- Removes any preconfigured LoRaWAN Network Server (LNS) entries
Press Enter to execute.
3.5 Upgrade RouterBOARD
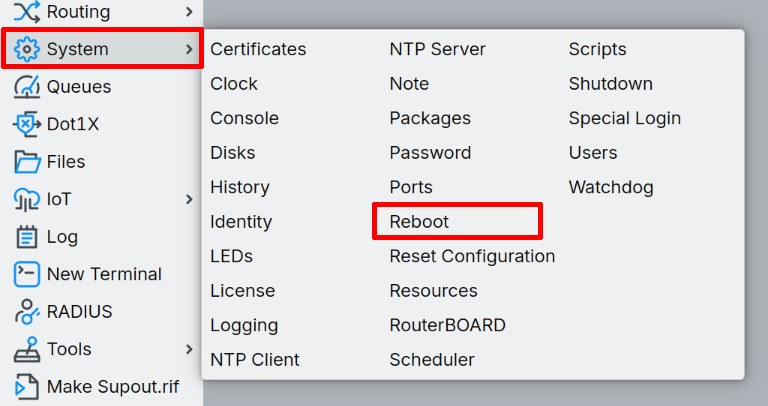
In the left panel, go to System → RouterBOARD and click Upgrade. A new window will open, click OK.
After upgrade you need to reboot the Ember. In the left panel, go to System → Reboot. A new window will open, click OK.
4) Choose your LoRaWAN backend
EMBER Cloud Service (managed backend)
EMBER Cloud Service is a fully managed LoRaWAN backend operated by HARDWARIO.
It is designed for a fast start without the need to run your own infrastructure.
What the service typically provides:
- ChirpStack – LoRaWAN Network Server
- Node-RED – data processing, payload decoding, and forwarding
- Preconfigured connectivity between the gateway, LNS, and integrations
Recommended if you want to get data from devices quickly and forward it to applications or dashboards.
Key links
-
Service overview and concept:
https://docs.hardwario.com/ember/cloud-service/ -
EMBER Cloud web portal (service management):
https://docs.hardwario.com/ember/cloud-service/#web-management -
ChirpStack in EMBER Cloud Service:
https://docs.hardwario.com/ember/cloud-service/#chirpstack-lorawan-server -
Node-RED in EMBER Cloud Service:
https://docs.hardwario.com/ember/cloud-service/#node-red-application
ChirpStack (self-hosted)
Documentation:
- ChirpStack (LoRaWAN Network Server overview):
https://docs.hardwario.com/ember/lorawan-network-server/lorawan-chirpstack
Additional resources:
-
Add EMBER gateway to ChirpStack v4 (HARDWARIO tutorial):
https://docs.hardwario.com/ember/chirpstack/chirpstack-ember/ -
(Optional) Install ChirpStack v4 (Debian/Ubuntu):
https://docs.hardwario.com/ember/chirpstack-v4-installation/
The Things Stack
Documentation
- The Things Stack (LoRaWAN Network Server overview):
https://docs.hardwario.com/ember/lorawan-network-server/lorawan-tts
Self-Hosted LoRaWAN Server
If you already run another LoRaWAN server, you can set EMBER to forward packets to your server.
Key note from the official Hotspot Configuration:
- If you do not use EMBER Cloud service, use your LoRaWAN server IP address and you don't need to configure VPN tunnels.
Reference: https://docs.hardwario.com/ember/hotspot-configuration/
5) Summary checklist
- LoRaWAN antenna attached (required)
- Power connected (24 V DC or 24 V passive PoE via WAN)
- Outdoor installation: connectors facing down
- PC connected to WAN, receives DHCP lease, can reach
172.31.255.1(updated from default) - RouterOS login works (
admin/[your-password]) - Initial configuration script completed (Section 3)
- RouterOS updated to latest version
- IoT package installed
- LoRa interface configured (antenna set to uFL)
- Bootloader updated
- Gateway is configured to your backend (EMBER Cloud / ChirpStack / TTS / other)
- In the LoRaWAN server UI, gateway status shows Last seen / connected
- You can see uplinks from at least one LoRaWAN device
Troubleshooting (quick)
Can't reach 172.31.255.1
- Make sure you are plugged into the WAN port (not LAN). LAN ports are ether2 and ether3 after running the configuration script.
- Ensure your PC is set to DHCP (or set a static IP in
172.31.255.0/24). - Check the Ethernet link LEDs.
- If you haven't run the configuration script yet, the default IP might still be
172.31.255.254.
Gateway is powered, but not "seen" in the LoRaWAN server
- Check if the jumper is disabled. Picture is here.
- Confirm the gateway's forwarding destination (server address / ports / protocol).
- Verify WAN/LTE Internet connectivity.
- Ensure the IoT package is installed (check with
/system package print). - Verify LoRa interface is configured (check with
/iot lora print). - If using EMBER Cloud, confirm you are using the provided service URL and correct configuration guidance.
Reset device
Unplug the power cable, hold the reset button and plug the power cable back in. After 5 seconds the LED will start blinking, release the button. The reset button location can be found in the image here.
Want to understand the baseline RouterOS configuration
- The reference configuration is documented here:
https://docs.hardwario.com/ember/hotspot-configuration/