Hotspot Configuration
In this article, you will find details on the EMBER Hotspot configuration. It is defined by the RouterOS configuration script.
System Concept
There is at least one site for EMBER service, but you can use several network server instances and several sites.
The minimal site configuration is:
-
One LoRaWAN device (such as CHESTER)
-
One LoRaWAN gateway (EMBER Hotspot)
-
One instance of a LoRaWAN server (ChirpStack or The Things Stack, self-hosted or operated by HARDWARIO as a managed service)
Every EMBER Hotspot can serve more than 100 LoRaWAN devices if these are within the radio coverage.
The redundant site configuration comes with a minimum of two EMBER Hotspot units (both within the radio coverage of the devices).
IP Addresses
These are the interfaces to which IP addresses apply:
-
WAN Ethernet: assigned using DHCP client
-
LAN Ethernet: non-routed
172.31.255.254cautionThis interface provides DHCP server functionality.
-
LTE Modem: assigned dynamically by an LTE carrier
-
OpenVPN endpoint:
192.168.16.10for the 1st hotspot,192.168.16.11for the 2nd hotspot, etc. -
WireGuard endpoint:
192.168.17.10for the 1st hotspot,192.168.17.11for the 2nd hotspot, etc.
The initial EMBER Hotspot has the following login credentials:
-
Username:
admin -
Password:
ember
The management is available through these services:
-
SSH: remote shell access
-
WinBox: desktop-based configuration application
-
WebFig: web-based configuration application
-
RouterOS API: HTTP REST API
The access is limited from the LAN IP network 172.31.255.0/24 and the managed service VPN endpoints 192.168.16.1 + 192.168.17.1.
VPN Tunnels
The HARDWARIO managed service is interconnected with all EMBER Hotspot units by two independent VPN tunnels over the LTE internet connectivity:
-
OpenVPN: TCP-based VPN for LoRaWAN traffic
-
WireGuard: UDP-based VPN for remote management of EMBER Hotspot
Protocol Basis
The supported LoRaWAN protocol is based on the LoRaWAN specification.
The supported LTE connectivity is based on 3GPP specifications.
Naming Convention
The EMBER Hotspot name is a compound of the customer identifier + managed service index + EMBER Hotspot index.
/system identity set name=ember-<customer identifier>-<01>-hotspot-<01>
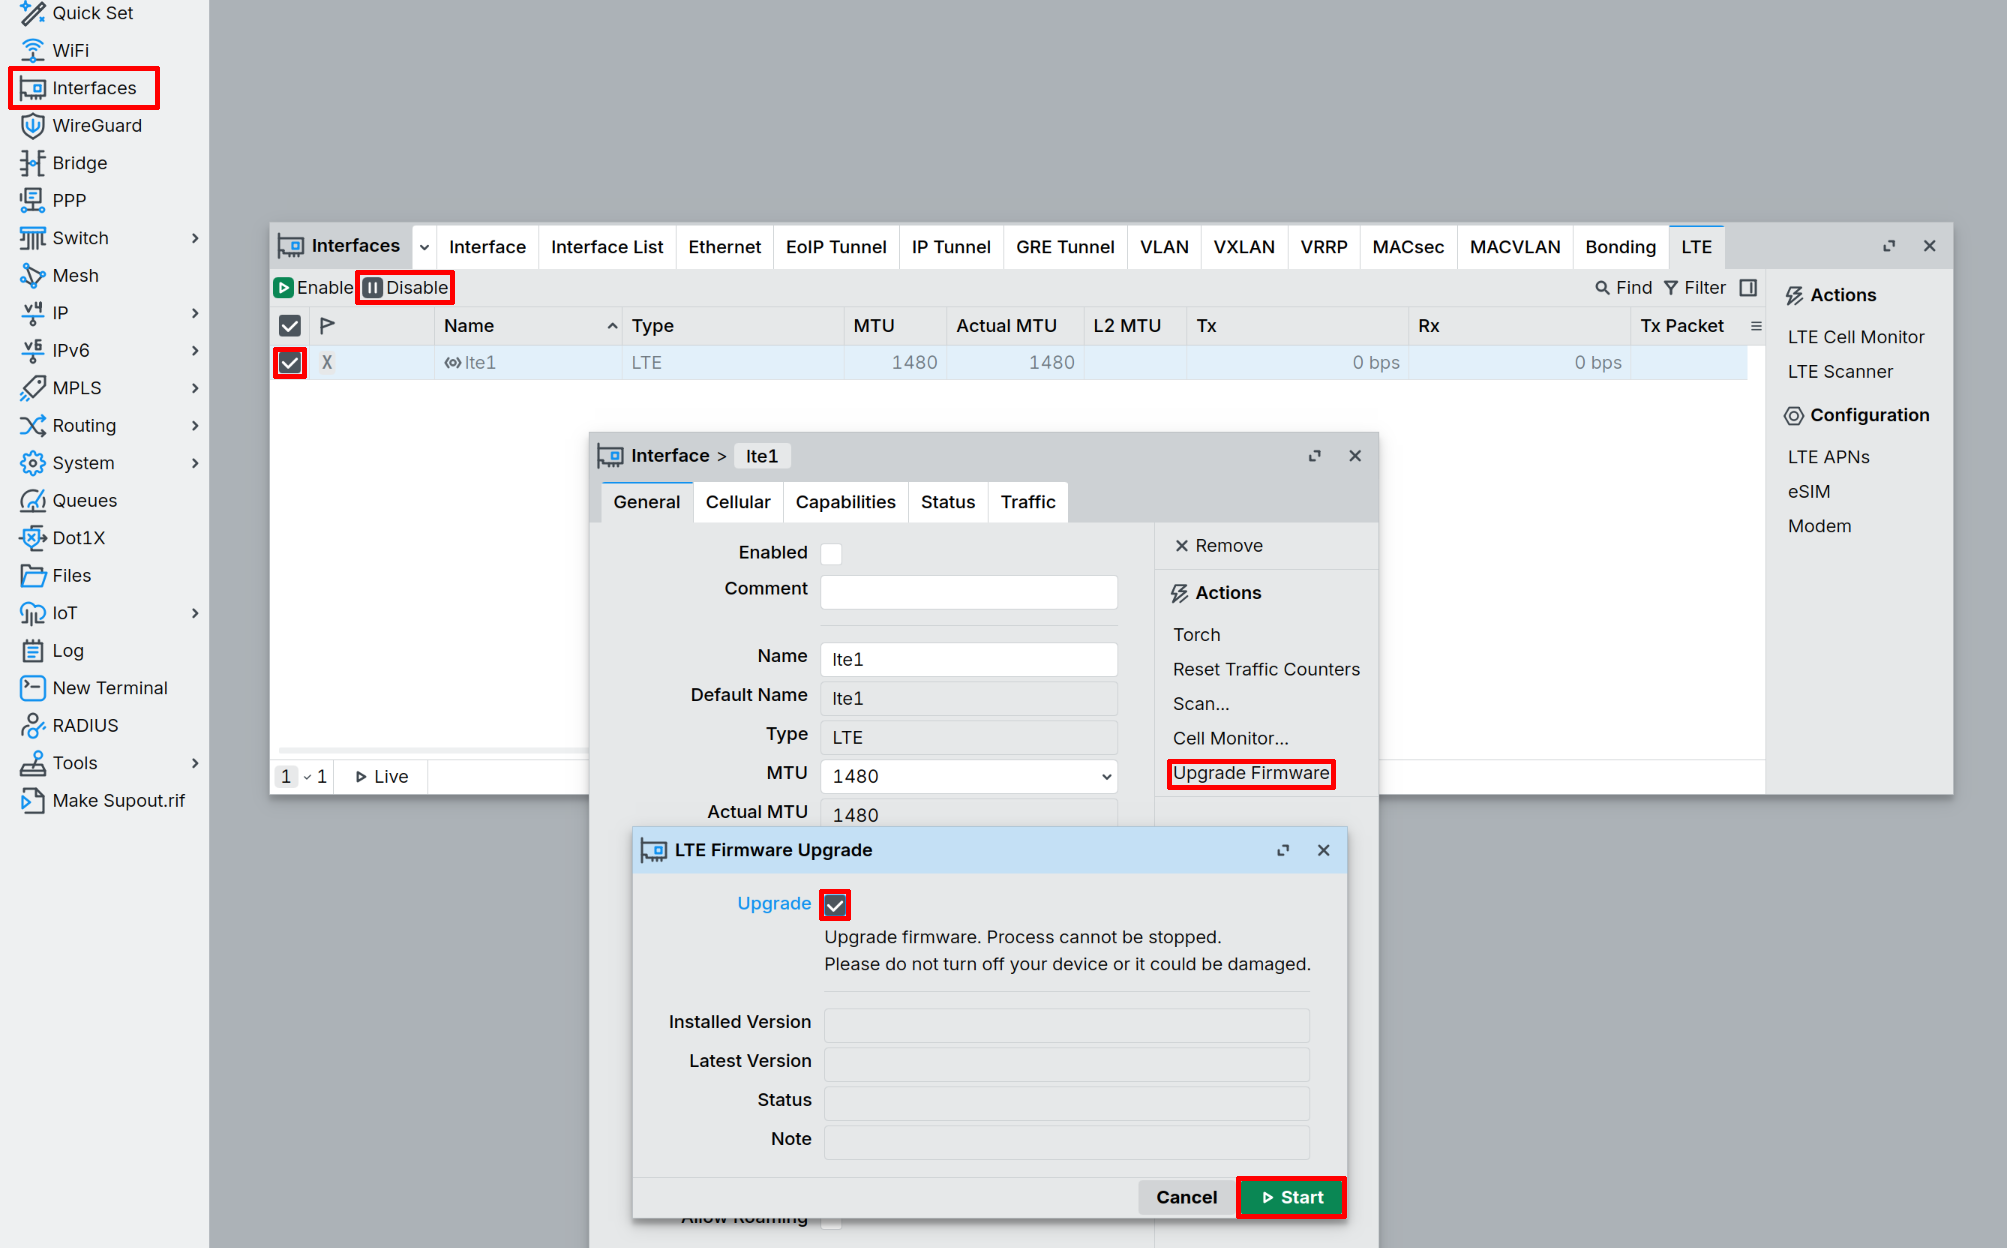
Update LTE
Keep the LTE modem firmware up to date to ensure stable connectivity.
- In the left menu, select Interfaces.
- Select your
lte1interface and click Disable. - Double-click the
lte1interface and select Upgrade firmware. - Click Start to check for available updates.
- If an update is available, check Upgrade and click Start.
- Once the installation finishes, reboot the device.
The SIM card requirement depends on the size of the version jump. For an upgrade of only one or two versions, the SIM card must be; inserted and configured for the upgrade to work. For a larger version jump, the upgrade completes without a SIM card present.
Do not disconnect power or interrupt the device during the firmware upgrade. An interrupted upgrade can leave the modem in an unusable state.
Interface Configuration
LAN
/interface bridge add name=bridge1
/interface bridge port add bridge=bridge1 interface=ether2
/interface bridge port add bridge=bridge1 interface=ether3
/ip address add address=172.31.255.254/24 interface=bridge1 network=172.31.255.0
/ip pool add name=pool1 ranges=172.31.255.100-172.31.255.199
/ip dhcp-server add address-pool=pool1 interface=bridge1 name=dhcp1
/ip dhcp-server network add address=172.31.255.0/24 dns-server=172.31.255.254,8.8.8.8,8.8.4.4 gateway=172.31.255.254 netmask=24
LTE
/interface ppp-client add apn=internet name=ppp-out1 port=usb3
/interface lte apn set [ find default=yes ] apn=internet ip-type=ipv4 use-network-apn=no
/interface lte set [ find ] allow-roaming=yes apn-profiles=default band="" name=lte1 network-mode=lte
/ip dns set allow-remote-requests=yes servers=8.8.8.8,8.8.4.4
/system clock set time-zone-autodetect=no time-zone-name=Europe/Prague
Replace internet with the APN provided by your mobile carrier.
SIM PIN Unlock
If the SIM card requires a PIN code, unlock it with:
/interface/lte/set lte1 pin="1234"
To permanently disable the PIN on the SIM card (recommended for unattended routers):
/interface/lte/at-chat lte1 input="AT+CLCK=\"SC\",0,\"1234\""
Replace 1234 with the actual PIN code of your SIM card.
Verification
Check the LTE connection status:
/interface/lte/monitor lte1 once
Verify internet connectivity:
/ping 8.8.8.8 count=3
WAN
LTE connectivity has precedence over WAN by router distance (default LTE router distance is 2).
/ip dhcp-client add default-route-distance=5 interface=ether1 use-peer-dns=no use-peer-ntp=no
OpenVPN
Certificates (Certificate Authority, EMBER Hotspot certificate, EMBER Hotspot private key) are imported from the managed service.
/interface ovpn-client add name=ember-cloud-ovpn certificate=hotspot-01.crt_0 connect-to=<public IPv4 of Cloud Service> port=1194 mode=ip protocol=tcp cipher=aes128 auth=sha256 tls-version=only-1.2 verify-server-certificate=yes use-peer-dns=no add-default-route=no user=hotspot-01
WireGuard
The WireGuard keys (public key for the managed service + private key for EMBER Hotspot) are taken from the managed service.
/interface wireguard add disabled=no listen-port=51820 mtu=1420 name=wireguard1
/interface wireguard peers add endpoint-address=<public IPv4 of Cloud Services> endpoint-port=51820 allowed-address=192.168.17.1/32 interface=wireguard1 persistent-keepalive=1m public-key="<WireGuard Cloud Service public>"
/ip address add address=192.168.17.10/24 network=192.168.17.0 interface=wireguard1
LoRaWAN
You can ignore the default TTN servers.
/iot lora servers add address=192.168.16.1 down-port=1700 name=ember-cloud up-port=1700 protocol=UDP
/iot lora set 0 antenna=uFL disabled=no name=gateway-0 network=private servers=ember-cloud
In case you do not use the HARDWARIO managed service, you have to use your LoRaWAN server IP address, and you don't have to configure the VPN tunnels.
Datacake
Datacake is an IoT platform that hosts a LoRaWAN server. To connect EMBER to Datacake, you need to register an account and create a dashboard. To add your your device to the dashboard:
- Add the Datacake server to the server list by running the following command on RouterOS
/iot lora servers add address=eu1.datacake-lns.com up-port=1700 name=datacake down-port=1700 protocol=UDP
- Assign the Datacake server to the LoRa device
/iot lora set 0 servers=datacake
- Add the gateway by providing the following details:
- A name for the gateway (any name)
- The
Gateway EUI(labeled asGateway IDon RouterOS underLoRa>Devices>gateway) - Frequency (according to the device's location)
Securing Access
The EMBER Hotspot is secured by a firewall and additional configuration options based on this MikroTik article.
Interface Lists
/interface list add name=wan
/interface list add name=lan
/interface list add name=management
/interface list member add interface=ether1 list=wan
/interface list member add interface=lte1 list=wan
/interface list member add interface=bridge1 list=lan
/interface list member add interface=bridge1 list=management
/interface list member add interface=wireguard1 list=management
Firewall
/ip firewall filter add action=fasttrack-connection chain=forward connection-state=established,related comment=FastTrack
/ip firewall filter add chain=forward action=drop connection-state=invalid comment="Drop invalid"
/ip firewall filter add chain=forward action=accept connection-state=established,related comment="Established, Related"
/ip firewall filter add chain=input action=accept connection-state=established,related comment="Established, Related"
/ip firewall filter add chain=input action=accept in-interface-list=management comment=Management
/ip firewall filter add action=drop chain=input
/ip firewall filter add action=accept chain=forward connection-state=new in-interface=bridge1 out-interface=ether1 comment="Internet for PC only from ether1"
/ip firewall filter add chain=forward action=drop
/ip firewall nat add action=masquerade chain=srcnat out-interface-list=wan
Services
/ip neighbor discovery-settings set discover-interface-list=lan
/ipv6 settings set disable-ipv6=yes max-neighbor-entries=1024
/tool mac-server set allowed-interface-list=none
/tool mac-server mac-winbox set allowed-interface-list=none
/tool mac-server ping set enabled=no
/ipv6 nd set [find] disabled=yes
/tool bandwidth-server set enabled=no
/ip proxy set enabled=no
/ip socks set enabled=no
/ip upnp set enabled=no
/ip cloud set ddns-enabled=no update-time=yes
/ip ssh set strong-crypto=yes
/ip service set telnet disabled=yes
/ip service set ftp disabled=yes
/ip service set api disabled=yes
/ip service set api-ssl address=172.31.255.0/24,192.168.16.1/32,192.168.17.1
/ip service set ssh address=172.31.255.0/24,192.168.16.1/32,192.168.17.1
/ip service set winbox address=172.31.255.0/24,192.168.16.1/32,192.168.17.1