Notification Rules Manager
The Notification Rules Manager is a tool for setting up automatic alerts based on data from your IoT devices (sensors, meters, etc.). It lets you define precise conditions under which you receive an e-mail or SMS — for example when temperature exceeds a set value, humidity drops below a threshold, or a device reports an unexpected reading.
A customer operating warehouses wants to be notified when the temperature in any warehouse exceeds 28 °C. They create a rule: Device = Warehouse_Sensor_A, Variable = temperature, Condition = > 28, Recipient = manager@company.com. From that point on, an e-mail is sent automatically whenever the sensor reads above 28 °C.
Logging In and Accessing the Dashboard
- Log in to the platform at app.hardwario.cloud with your e-mail and password.
- In the left navigation menu, click Notifications.
- The Notification Rules Manager dashboard opens. If this is your first visit, the rules table will be empty.
The Notifications menu item is only visible to customers who have been granted access to this dashboard. If you cannot see it, please contact your platform administrator.
Access Levels
| Role | Access |
|---|---|
| Customer Administrator | Full access — can create, edit, copy, delete, and enable/disable rules. |
| Customer User | Read-only — can view rules but cannot create, edit, copy, delete, or toggle them. |
If you are a Customer User and need to modify a rule, contact your Customer Administrator.
Interface Overview
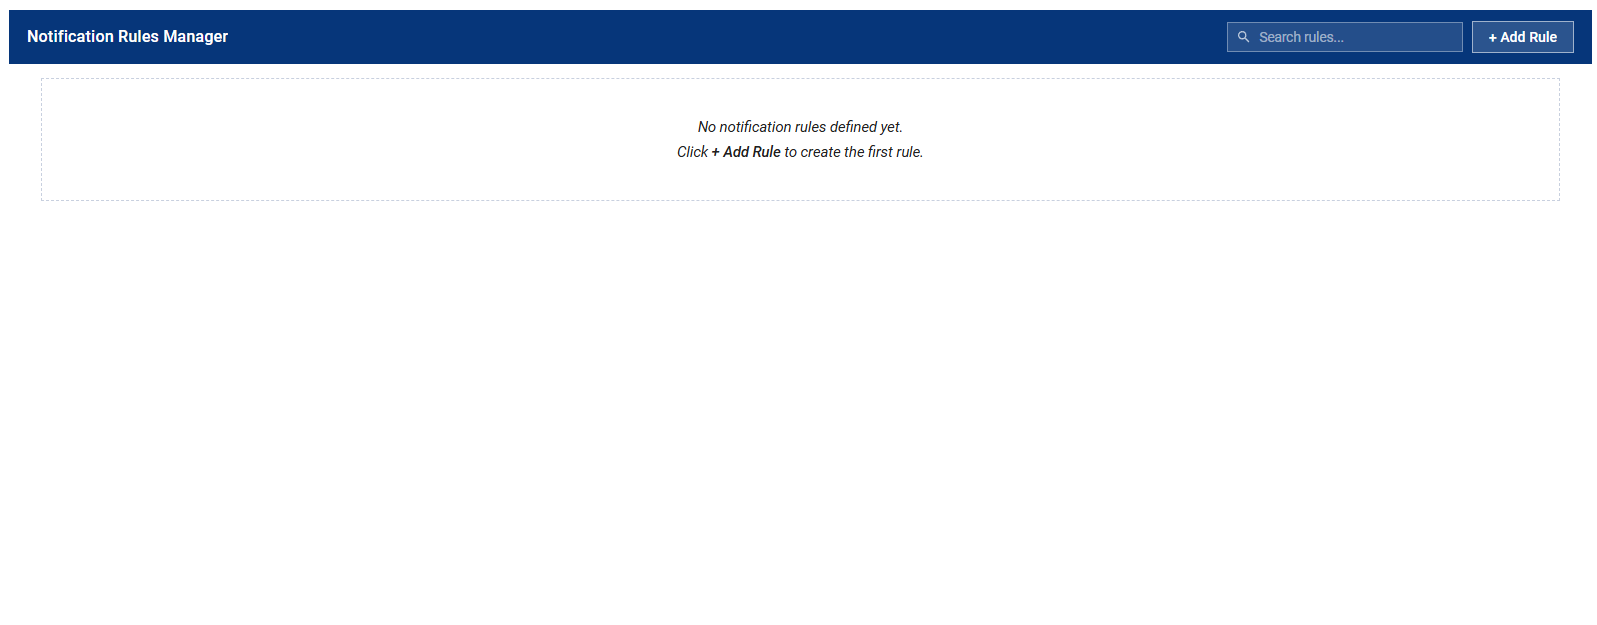
Table Columns Explained
| Column | Description |
|---|---|
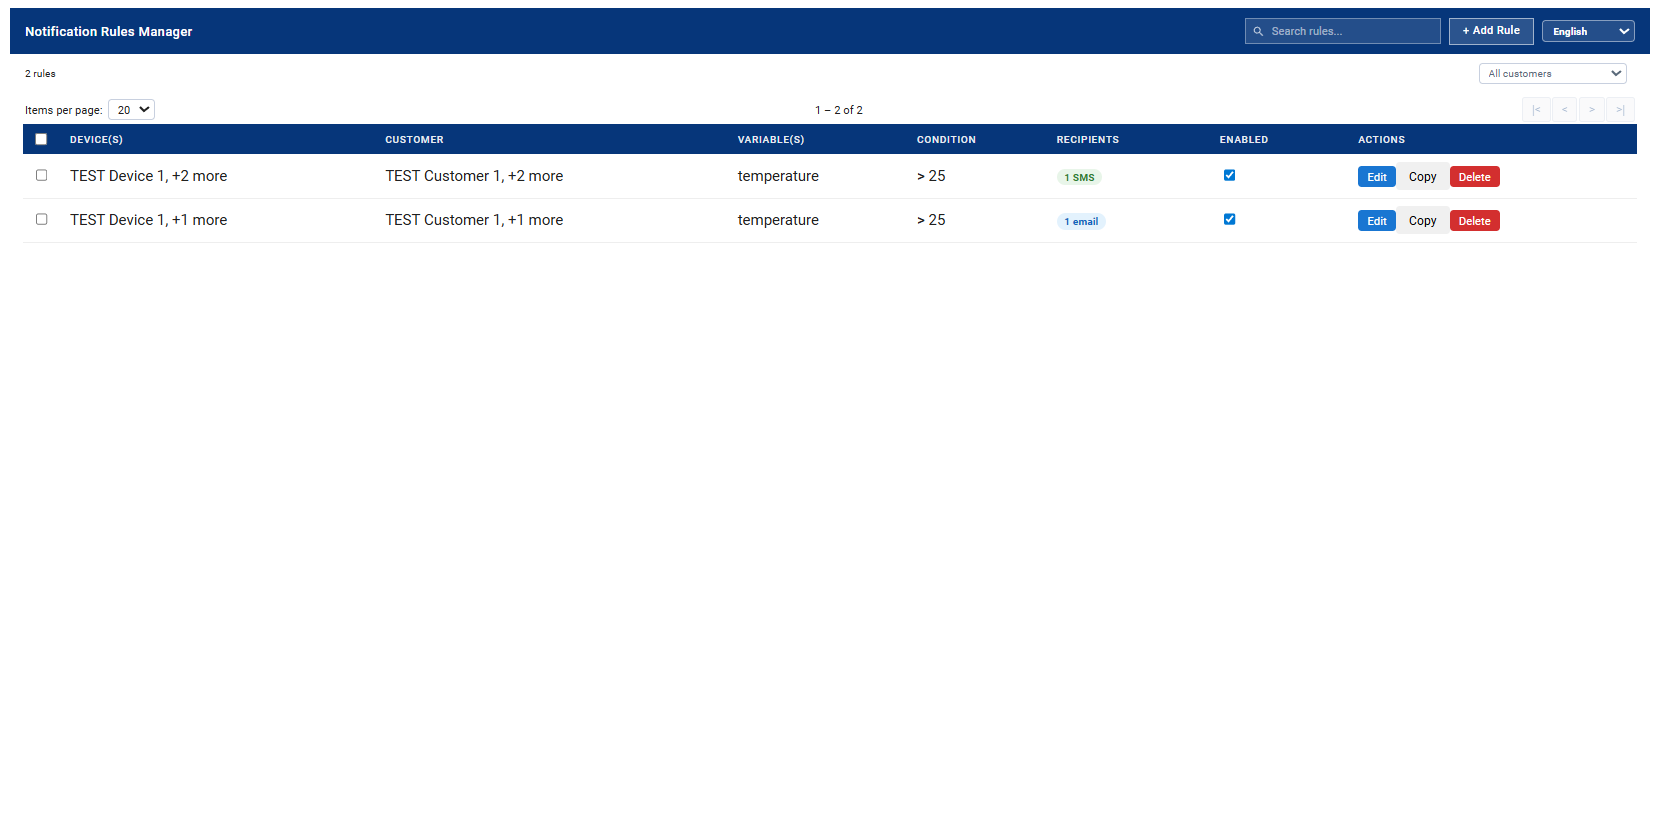
| Device(s) | The first monitored device. If there are more, a +N more badge appears — hover to see the full list. |
| Customer | The customer(s) the devices belong to (shown when sub-customers exist). If devices span multiple customers, shows the first one with +N more. |
| Variable(s) | The telemetry key(s) being watched. |
| Condition | The trigger condition and threshold, plus Duration/Cooldown badges if set. |
| Recipients | Number and type of recipients (email or SMS). Hover to see the list. |
| Enabled | Toggle to enable/disable the rule without deleting it. |
| Actions | Edit · Copy · Delete |
Creating a New Rule
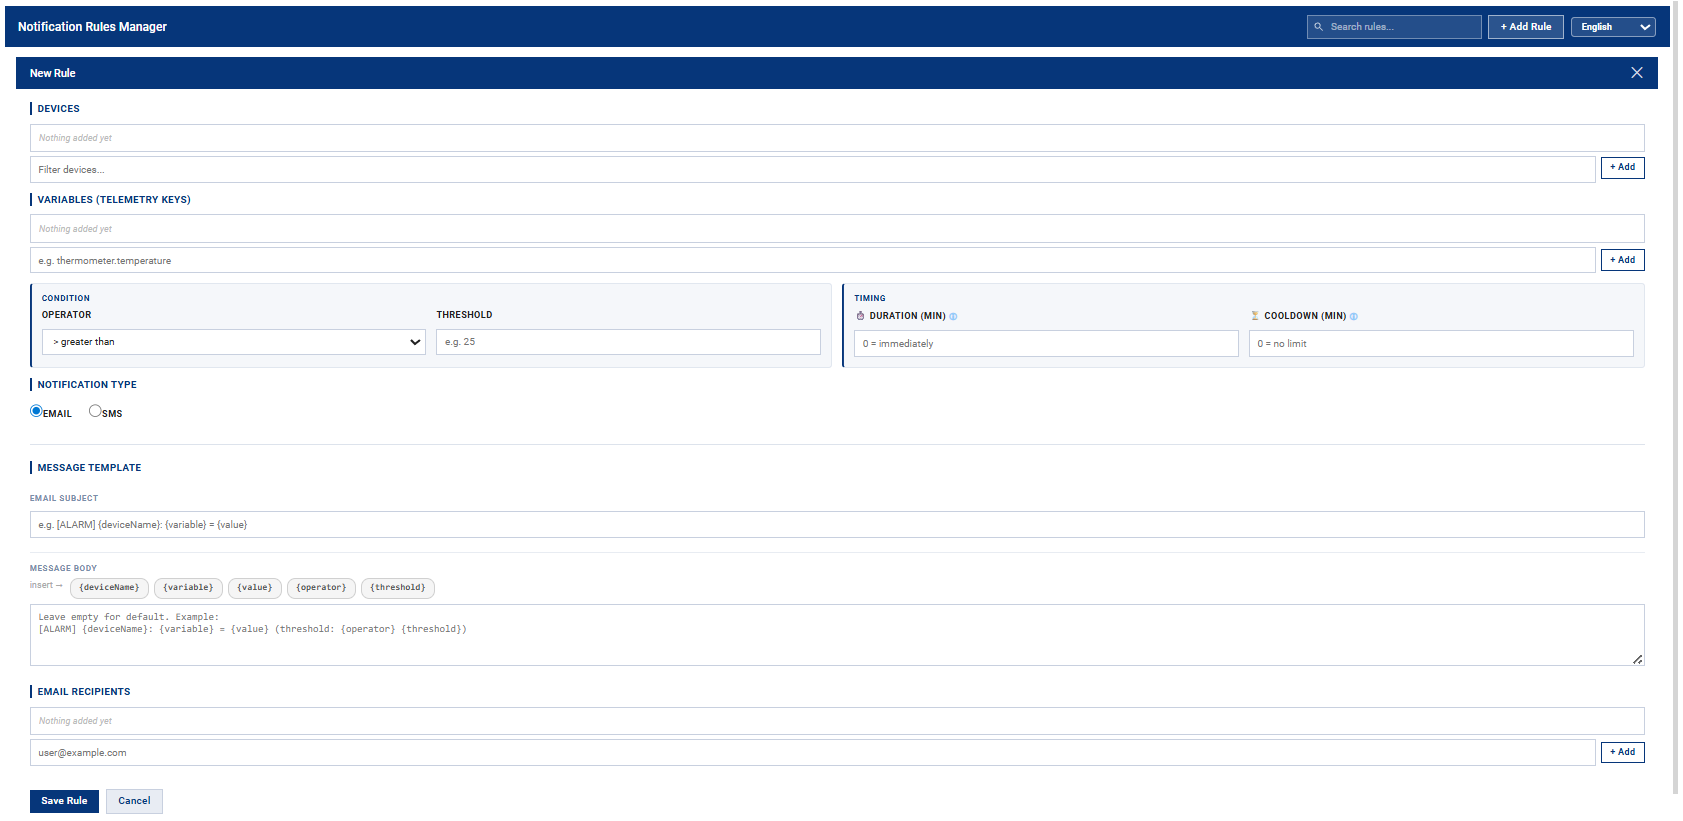
Click + Add Rule in the top-right corner of the widget. The rule form opens below the header.
Step 1: Select Devices
In the DEVICES section, select the device(s) this rule should monitor. A single rule can watch multiple devices at the same time.
- Click the Filter devices... field — a dropdown list of available devices appears.
- Start typing to filter by name, or scroll and select from the list.
- Click the device in the dropdown or press + Add. It appears as a tag above the field.
- Repeat for additional devices. Remove a device by clicking × on its tag.
Adding multiple devices means the rule will be evaluated for each device independently. A notification fires whenever any of the selected devices meets the condition.
Step 2: Select Variables
In the VARIABLES section, select or type the telemetry key(s) to monitor.
Using the variable picker (recommended):
Once at least one device is selected, click the variable field — a dropdown appears showing all telemetry keys that the selected devices have already sent. When multiple devices are selected, the keys are grouped:
- Common to all devices (N) — keys available on every selected device. These are the most useful for multi-device rules.
- Per-device groups — keys that exist only on specific devices.
Click a key to add it as a tag. Already-added keys are marked with ✓ and cannot be added twice.
Typing a key manually:
Type any key name directly in the field and press Enter or click + Add. This is useful for devices that have not yet sent any telemetry.
The variable name must match the telemetry key exactly as sent by the device (case-sensitive). To verify available keys, open the device in ThingsBoard → Latest Telemetry tab.
Step 3: Set the Condition
In the CONDITION block, define when the notification should fire.
| Field | Description | Example |
|---|---|---|
| Operator | Comparison operator: greater than, less than, equals, greater or equal, less or equal. | > greater than |
| Threshold | The value to compare the telemetry reading against. | 28 |
Example: Operator = > greater than, Threshold = 28 means: "Send a notification when the variable value exceeds 28."
Step 4: Configure Timing
The TIMING block contains two optional fields for fine-grained control. Leave them at 0 for default behaviour.
| Field | Description | Default |
|---|---|---|
| Duration (min) | The condition must be met continuously for this many minutes before a notification is sent. Eliminates short spikes. | 0 = send immediately |
| Cooldown (min) | Minimum time between two notifications for this rule. Prevents notification flooding. | 0 = no limit |
Step 5: Add Recipients
Notification type — Select Email or SMS in the NOTIFICATION TYPE section. The appropriate recipient field will appear.
Email recipients:
- Type an e-mail address in the user@example.com field.
- Press Enter or click + Add. The address appears as a tag.
- Repeat for additional recipients.
SMS recipients:
Enter a phone number in international format: +420600123456. Adding works the same way as for e-mail.
You can add any number of recipients to one rule — the notification is sent to all of them simultaneously.
Step 6: Save the Rule
Once all required fields are filled in, click Save Rule. The rule is saved immediately and starts being evaluated in an enabled state. It appears in the rules table.
- At least one device
- At least one variable
- A threshold value
- At least one recipient (e-mail or SMS)
Managing Existing Rules
Editing a Rule
Click Edit on the rule you want to change. The form opens with pre-filled values. Make your changes and click Save Rule.
Copying a Rule
Click Copy. A new rule form opens with the same values as the original. Adjust what you need (e.g. different threshold or device) and save.
Copying is ideal when you want a similar rule for a different device or threshold, without filling in everything from scratch.
Deleting a Rule
Click Delete. A confirmation dialog appears. Once confirmed, the rule is permanently removed from all devices it was saved on.
Deletion is permanent and cannot be undone. If you only want to temporarily stop notifications, use the Enabled toggle instead.
Enabling / Disabling a Rule
Each rule has a toggle switch in the Enabled column. Switching it off deactivates the rule — no notifications will be sent, but the rule remains saved and can be re-enabled at any time.
Filtering and Sorting Rules
Search
Use the Search rules... field in the top-right corner. Results update in real time across all fields (device name, variable, recipient, etc.).
Customer Filter
If your organisation manages sub-customers, a dropdown filter appears in the top bar. Selecting a customer shows only rules for devices belonging to that customer.
Sorting
Click any sortable column header to sort. Click again to reverse the order. An arrow indicator ˅/˄ shows the active sort direction. Sortable columns:
- Device(s) — device name
- Customer — customer name
- Variable(s) — variable name
- Recipients — notification type (email / SMS)
- Enabled — active / inactive
Understanding Duration and Cooldown
| Setting | What it does | When to use it |
|---|---|---|
| Duration (minutes) | The condition must be continuously met for this many minutes before a notification is sent. A brief spike will not trigger an alert. | You want to ignore short or random fluctuations and only react to a sustained state. |
| Cooldown (minutes) | Minimum time between two notifications for this rule. Even if the condition remains met, the next message will not be sent until this interval has elapsed. | You want to limit notification frequency — e.g. at most one alert per hour, not fifty. |
If you are unsure, set Duration = 0 and Cooldown = 30. Notifications fire immediately when the condition is met, but no more than once every 30 minutes.
Frequently Asked Questions
I did not receive a notification even though the condition should have been met. What should I check?
- Is the rule enabled? Check the Enabled toggle in the table.
- Is the variable name spelled correctly? It must exactly match the telemetry key sent by the device.
- Is Duration set to a high value? The condition must be met continuously for the full duration.
- Is Cooldown active and has it not elapsed yet?
- Is the e-mail address or phone number entered correctly?
- Check your spam/junk folder — the notification e-mail may have been filtered.
Can I set one rule to apply to multiple devices and multiple variables at the same time?
Yes. Add multiple devices and multiple variables when creating the rule. The rule is evaluated for each device + variable combination independently. When multiple devices are selected, the variable picker automatically shows which telemetry keys are common to all selected devices and which are specific to individual ones.
The language of the interface changed — how do I switch it back?
Use the language selector in the top-right corner of the widget. Your choice is saved per user account — other users are not affected.
What happens when I delete a rule that was saved on multiple devices?
The rule is removed from all devices it was saved on. This action is irreversible.
How do I find out which telemetry keys my device sends?
Open the device detail in ThingsBoard (section Devices), then click the Latest Telemetry tab. All keys and their current values are listed there.
Can I set a rule for a sub-customer's device?
Yes. If you manage sub-customers, select the relevant customer using the filter in the top bar. Only that customer's devices will be shown when creating a rule.
What does the "1 email" or "1 SMS" badge in the table mean?
It shows the number and type of recipients for that rule. Hover over the badge to see the actual addresses or phone numbers.
How do I know if a rule fired?
You will receive an e-mail or SMS as configured. The notification contains the device name, variable, measured value and the condition that was triggered.