HARDWARIO Blockly
To work with this tool you need to download an experimental HARDWARIO Playground
This tool is still in development and can break sometimes. In that case, you can contact us on GitHub or directly at ask@hardwario.com.
You can probably fix the issue on hand just by restarting Playground.
We used Google Blockly to create our implementation of a No-Code/Low-Code environment for TOWER.
Blockly Environment
This is the main feature of this tool. It provides an environment for programming with colorful blocks without the need to write a single line of code.
This is a Low-code/No-code environment which means that you don't need to know how to write code to make it work.
It is designed to make firmware creation fast and easy for users on any level of knowledge.
Examples
If you are interested in how to work with this environment or just what our firmware looks like, we prepared some examples from the easier ones to the more complicated ones. Thanks to this you should be able to start with blockly right away.
There is a difference between a classic project and an example. You can't save an example, so if you are interested in changing some examples you should click on Project From Example. It will reopen the example as a project and you can do anything you want with it.
Project Structure
Working with blockly is pretty straightforward but we had to make some changes.
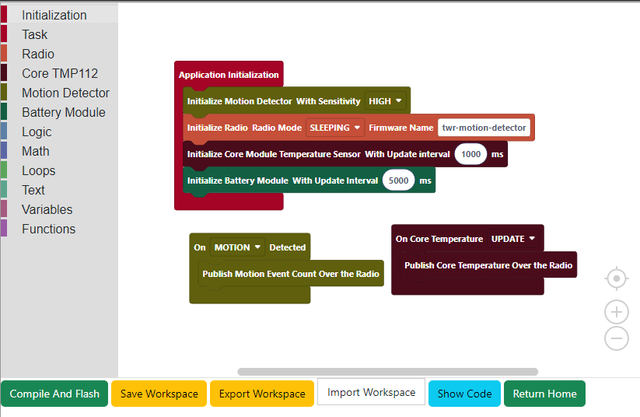
This image shows a basic project in HARDWARIO Blockly, here we will go over some important elements.
Workspace
Most of the screen. This is where you will place all your blocks that will represent your firmware.
The first block that you drag into this space should always be the block in Initialization category with the text Application Initialization. This serves as a starting point for your application.
We tried to make it simpler for the user to work with the environment. There is some automatization in place, like disabling not initialized blocks, disabling orphan blocks, deleting initialization duplicates, etc.
Toolbox
On the left side of the screen. This has all the categories available for you and in those categories the blocks themselves.
We made it a little bit simpler by showing only those categories that are initialized. So if you don't see some category in the toolbox, go into the Initialization category and initialize it with the use of an appropriate block.
Bottom Panel
At the bottom of the page. This is where you can find some additional controls for blockly.
Buttons at the bottom panel:
- Compile And Flash - This will run the compilation and then switch to the firmware tab to allow you to flash the created firmware to your device.
- Save Workspace - This will save the current workspace. Autosave is enabled by default.
- Export Workspace - You can export the workspace in .xml format so you can distribute it or import it later.
- Import Workspace - Here you can import the workspace in .xml format.
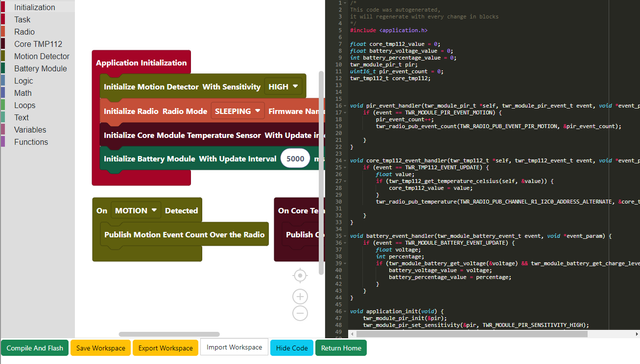
- Show/Hide Code - This will show/hide code so you can see the generated code in C language.
- Return Home - This will return you to the homepage.
To make your project work you have to add the Application Initialization block to the workspace
Live Code Generation
This tool provides the possibility to show live-generated C code that is identical to the blocks in the workspace.
Thanks to this, you can create some basic firmware with the use of blocks, then take the code and finalize it in the HARDWARIO Code.
Compiling and Flashing
For this to work, you have to have CMake, Ninja and git installed on your device and in the PATH. You can find more info about this in chapter TOWER VSCode Extension.
After you are finished with your firmware, you can simply click the Compile and Flash button at the bottom of the page. After a while, it will switch to the firmware tab and you can just select your device and flash it.
More about flashing in the Firmware Flashing chapter
Other Features (ADVANCED)
This is an advanced part of this tool. You don't need to use it at all but if you are interested in creating your categories and custom blocks that you can then use in the HARDWARIO Blockly.
Portability
To open your user folder, click on Open Projects Folder in Blockly index or on Open Blocks Folder in Blocks Creator index.
If you want to distribute your projects or created blocks you can just copy the user folder from your filesystem, compress it to for example zip file and send it. On the other side, the user can just unzip it to their user folder and then reload Blockly in Playground.
Blocks Generation
To access this feature click on the Go to Blocks Creator button at the Blockly index.
Categories
To edit your categories just click Edit your categories button at the top of the Blocks Creator screen.
You need to add categories to put your custom blocks into them. You can also use pre-made categories that we use but it is not advisable.
Here is an example of how to add some basic categories. You can add a category without any other configurations or you can add color to the category (in RGB format).
This example will add the category Ultrasound Sensor** with black color (default color) and category External Temperature Sensor with color "#CF0514".
Basic Categories Example
---
categories:
  Ultrasound Sensor:
  External Temperature Sensor:
    colour: '#CF0514'
Blocks
You can add your custom blocks with the use of Blocks Creator.
The first example is one of our pre-made modules for the Button Module of TOWER. You can see the structure of the file here.
-
category- determines which category will be used for the blocks of this module (the category has to be included in the pre-made or your categories). -
global_variable- here you can add line by line anything that you want to add at the top of the code. -
application_init- here you can define the block that will always go into the Initialization category-blocktext- here you should specify what text will be present on the block. You can use%to make some parts generated from the arguments.arguments- here you have to specify one by one the arguments that will replace the%in the text bydropdown/number/variable/etc.
code- here, line by line you specify the code that will be added toapplication_init. You can use{ARGUMENT_NAME}to have some parts replaceable based on thearguments.
-
handler- this is the block that will represent the event handler of your module. It will be a block that will allow you to put more blocks in it (parent block) -
action- this is the place to add every possible action that your module can do. Each of those elements will be a separate block added to your specified category.NAME_OF_THE_ACTION- you just specify the block name, it has to be module specific.block- this is the same as with theapplication_initpart, the block will just be placed in the specified category.code- code is the same as well.
Pre-made button module
---
button:
  category:
    - Button
  global_variable:
    - twr_button_t button;
  application_init:
    block:
      text:
        - Initialize Button %1
        - Button GPIO %2 %3
        - Button Pull %4 %5
        - Default State %6
      arguments:
        X:
          type: new_line
        GPIO:
          type: dropdown
          options:
            - ["BUTTON", "TWR_GPIO_BUTTON"]
        Y:
          type: new_line
        PULL:
          type: dropdown
          options:
            - ["DOWN", "TWR_GPIO_PULL_DOWN"]
            - ["NONE", "TWR_GPIO_PULL_NONE"]
            - ["UP", "TWR_GPIO_PULL_UP"]
        Z:
          type: new_line
        DEFAULT_STATE:
          type: dropdown
          options:
            - ["TRUE", "TRUE"]
            - ["FALSE", "FALSE"]
    code:
      - twr_button_init(&button, {GPIO}, {PULL}, 0);
      - twr_button_set_event_handler(&button, button_event_handler, NULL);
  handler:
    block:
      text: On Button %1
    declaration: void button_event_handler(twr_button_t *self, twr_button_event_t event, void *event_param)
    events:
      prefix: TWR_BUTTON_EVENT_
      enum:
        PRESS:
        RELEASE:
        CLICK:
          - button_click_count++;
        HOLD:
          - button_hold_count++;
  action:
    publish_click_count:
      block:
        text:
          - Publish Button Click Count Over the Radio
      code:
        - twr_radio_pub_push_button(&button_click_count);
    publish_hold_count:
      block:
        text:
          - Publish Button Hold Count Over the Radio
      code:
        - twr_radio_pub_event_count(TWR_RADIO_PUB_EVENT_HOLD_BUTTON, &button_hold_count);