Debugging
If you want to use the JLink probe to do some advanced debugging, you can read the separate chapter for that.
Starting Simple
The easiest way to debug and also the way how all the things started was just to print out whatever you consider important to know.
We will use the serial port to print the information over USB into the connected PC.
Core Module
The Core Module has an integrated FTDI chip connected to the UART2. You do not need to use a separate serial converter, just connect the USB cable to your computer.
Logging Example
You can visit the twr_log SDK Module.
Logging Code Example
#include <application.h>

// LED instance
twr_led_t led;

// Button instance
twr_button_t button;

void button_event_handler(twr_button_t *self, twr_button_event_t event, void *event_param)
{
    (void) self;
    (void) event_param;

    if (event == TWR_BUTTON_EVENT_PRESS)
    {
        twr_led_set_mode(&led, TWR_LED_MODE_TOGGLE);
    }
    // Logging in action
    twr_log_info("Button event handler - event: %i", event);
}

void application_init(void)
{
    // Initialize logging
    twr_log_init(TWR_LOG_LEVEL_DUMP, TWR_LOG_TIMESTAMP_ABS);

    // Initialize LED
    twr_led_init(&led, TWR_GPIO_LED, false, false);
    twr_led_set_mode(&led, TWR_LED_MODE_ON);

    // Initialize button
    twr_button_init(&button, TWR_GPIO_BUTTON, TWR_GPIO_PULL_DOWN, false);
    twr_button_set_event_handler(&button, button_event_handler, NULL);
}
Example of output:
# 4.54 <I> Button event handler - event: 0
# 4.84 <I> Button event handler - event: 1
# 4.84 <I> Button event handler - event: 2
# 10.24 <I> Button event handler - event: 0
# 12.24 <I> Button event handler - event: 3
# 13.64 <I> Button event handler - event: 1
Colored Logs
You can colorize logs into 4 different colors with commands down below.
Debug (purple)
twr_log_debug("Log");
Info (green)
twr_log_info("Log");
Warning (orange)
twr_log_warning("Log");
Error (red)
twr_log_error("Log");
Read Logs With HARDWARIO Code
If you didn’t already, you should install HARDWARIO Code.
You can use our Visual Studio Code extension to attach the console to the connected Core Module.
You can use two commands in the extension to attach the console:
It is advised to use the first one. It will build the firmware so it includes all the changes that you did and flashes it to the device. After the flashing is done the console will be attached and you can see all the logs.
If you just want to attach the console to the running Core Module without building and flashing, you can use the Attach console command.
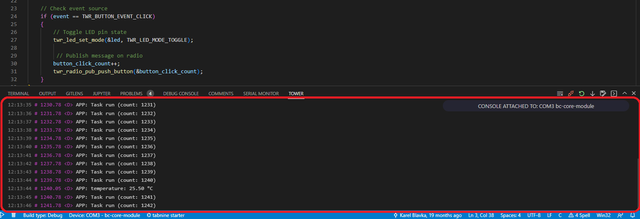
Either way, you should see the log messages in the console at the bottom tab
To learn more about this console you can visit HARDWARIO TOWER Console chapter.
You can check those links for more information: